Usage
From commandline:
Usage: python3 Pub2SDwizard.py
From desktop (Windows 64bit binary), double-click on the Pub2SDwizard icon.

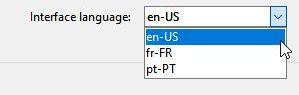
Which interface language?
Your first choice is which interface language you wish to work with. The gui interface language can be selected from the drop-down list at the top right of the screen and can be changed at any time.
Next Pub2SDwizard starts by asking three questions:
The name of your project?
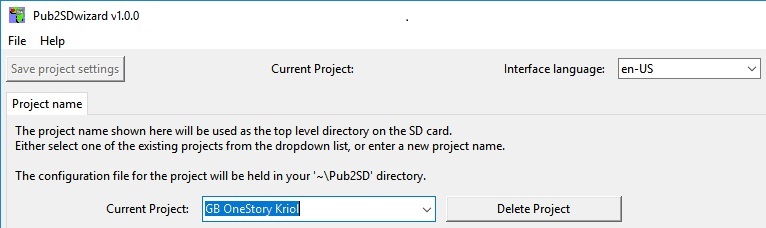
This can either be entered directly or chosen from the drop-down list. The project settings can be saved at any time and will be held in a ‘<project name>.prj’ file stored in a ‘Pub2SD’ folder under your home folder (i.e. ‘C:Users<username>Pub2SD’ for Windows or ‘~/Pub2SD’ on Linux). This project name will also be used as the name of the top level folder on the SD card which will hold your published files.
The type of your project?

The type of project can be changed later. If you start with a ‘Advanced’ project and later want to convert it to a ‘Simple’ project, any of the tags which are only available in ‘Advanced’ mode will be removed and their data lost.
A simple project will only allow you to use tags which can be presented as simple strings and restricts you to a single piece of artwork and a single comment whose language is not defined.
A number of the ‘advanced’ tags allow you to have multiple entries for each tag distiguished by theit ‘language’ and ‘desciption’ fields. In addition there are many different types of artwork that can be included. Though not all applications may recognise these features.
Once you’ve chosen your project name and select your project type, you can click on the ‘Next’ button. This will update the ‘Current project:’ and ‘Mode:’ fields near the top of the window. However you may wish to select some additional items from the ‘Optional’ section first.
Optional extras?
These features can be ignored if you are happy to accept the default settings.
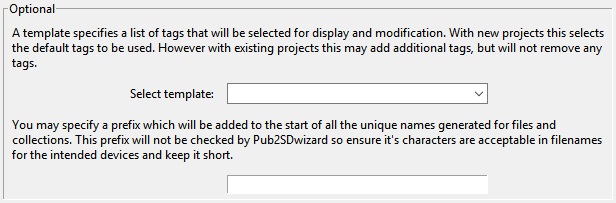
Which template?

When you first run the program the there won’t be any templates listed and so you can ignore this choice and receive a default set of tags pre-selected for you. Later once you have created one or more templates you will be able select the one you wish to attach to this project. On new projects this will determine which tags will be shown as pre-selected on the ‘Choose MP3 tags’ tab. However with an existing project any new tags specified by the template will be added to the list of tags selected for modification and display. This will never remove any tags already present in the project.
Once you have created some templates you can manually edit the ‘.json’ template files, in your ‘\Documents\Pub2SD’ folder, to add ‘default values’ to some or all of the tags listed by their four character tag codes. Then whenever an MP3 file is loaded into a project which has that template attached these default values will be pre-loaded into Pub2SDwizard for any tags which are blank. No existing tag data will be overwritten by this mechanism.
What prefix?

Pub2SDwizard will generate unique names for every collection and MP3 file which will be combined with their filename/Title to ensure they can be referenced unambiguosly. You may specify a prefix which will be added to the start of all the unique names generated for files and collections. This prefix will not be checked by Pub2SDwizard so ensure that it’s characters are acceptable in filenames for the intended device(s) and keep it short.
Choose MP3 tags
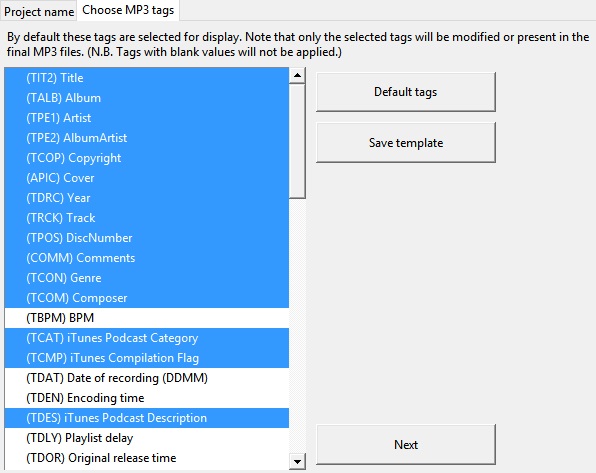
On new projects, the tags specified by your template or in it’s abscence the most commonly used tags are selected by default. In existing projects the tags already chosen along with any new tags specified in your template are selected by default. You can add to or remove tags from the selection with a ‘Ctrl+click’ on the tag of interest. You can restore a default selection ofmost commonly used tags by clicking on the ‘Default tags’ button.
Note that only the selected tags will be modified or present in the final MP3 files. (N.B. Tags with blank values will not be applied.)
If you are loading an existing project you can add and remove tags at this stage. The contents of any tags which are removed will be discarded. Any new tags will be blank.
You can create a new template holding the tags currently selected by clicking on the ‘Save template’ button and supplying a descriptive name when it is requested.
Click on the ‘Next’ button to proceed.
Special characters
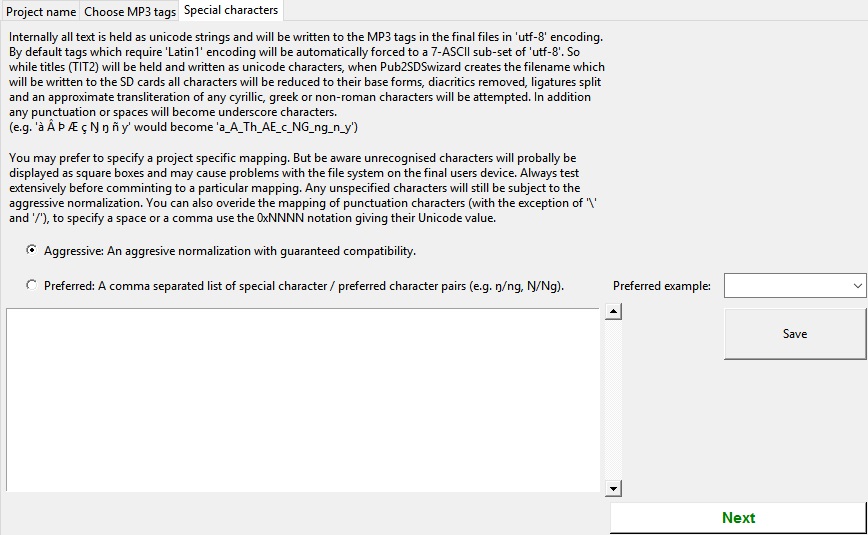
By default, tags which require ‘Latin1’ and the filenames generated are aggressively normalised to remove any special characters to guarantee compatibility, any punctuation characters or spaces will be replaced with underscores. You can override this by specifying any preferences you have. Your preferences will be saved in the project, but only have effect if the ‘Preferred:…’ option is chosen. You can also save your preferences as a separate ‘.csv’ file as examples for other projects. A ‘Latin1’ example (which would allow some acented characters etc… and still be compatible with most devices) is always availble from the dropdown list. Other examples will be added to this list as you save them.
Clicking on the blank line in the drop down list will clear the list of preferences. Clicking on ‘Latin1’ or any other examples you’ve saved will append them to your list of preferences.
To get the basic ‘Latin1’ set, select ‘Preferred’ on the ‘Special characters’ tab and select ‘Latin1’ from the pull-down list on the right. You should now see a list of character pairs, in this case telling Pub2SDwizard to retain them since both members of each pair are identical. If you wanted to replace say ‘~’ with ‘-‘ rather than underscore you’d add ‘, ~/-‘ to the end of the list. You could even override what happens to spaces or commas by using 0xNNNN notation for their Unicode values. So 0x0020/0x0020 would retain the spaces, while 0x0027/0xA78C would replace the apostrophe with the lower case saltillo. (Though I don’t know how many phones would actually display it!).
The preferred list is strictly a set of pairs of strings rather than characters so ‘Ŋ/Ng’, ‘ng/ŋ’ or even ‘Tom/Fred’ would work. The characters in the strings on either side of the ‘/’ can either be entered directly or as their Unicode values using the 0xNNNN notation.
Edit…
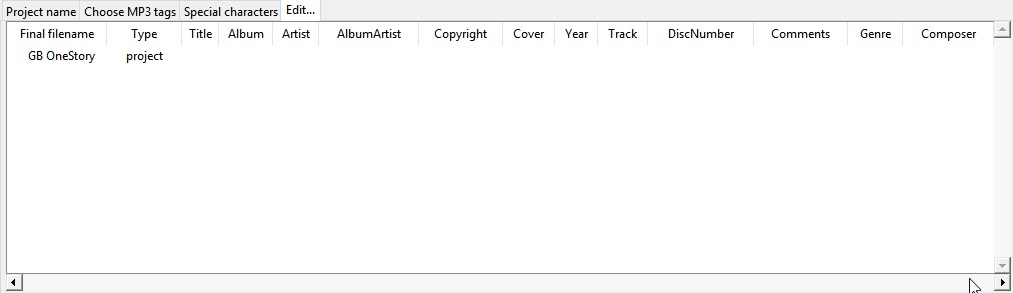
The project will be shown as the top level collection, this can’t be moved or deleted.
Import hierarchy
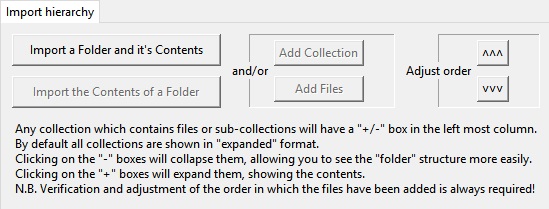
In ‘Simple’ mode only the ‘Import a Folder and it’s Contents’ button is enabled. This will select the folder you specify and create a collection of the same name. Then it will import all MP3 files from that folder into the collection, creating sub-collections for any sub-folders and importing their files to them. Only the MP3 files and the sub-folders will be imported, any other files will be ignored.
While your project will normally reflect the folder structure holding your source MP3 files in, ‘Advanced’ mode allows you to add collections and files arbitarily. Note if you wish to add a file you must first select the row holding the collection you wish to add it to.
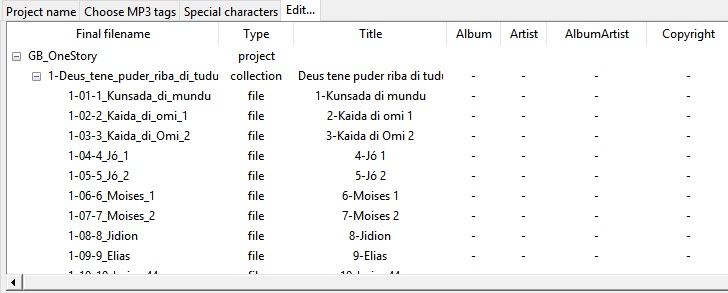
The software will try to list the collections and files in a logical order, BUT you must always verify that the order in which the files are displayed is the order you wish them to be played in, adjusting it as necessary. Note that the title for any collections will be based on the folder name it derived from rather than the title tag in an MP3 file. So any compromises made in representing the orthography for the original operating system will be preserved. Consequently you must always verify that the titles of the collections are as you wish them to appear(e.g Saa+ï needs replacing with either Saang or Saaŋ).
Once you have imported the files and arranged them in the order you wish, you are recommended to save the project. On restarting the program and selecting the project all your existing settings and hierarchy will be restored. Additional files may be added to the project.
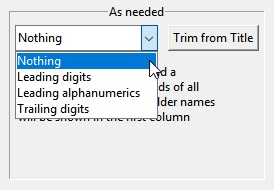
Trim from Title
Based on the order files are displayed Pub2SDwizard will create and maintain unique names for each file and use these when the files are published with the MP3 title (or original filename) appended. Individual files have often had leading or trailing characters added to their filenames (and/or their MP3 titles) to help determine the sequence in which they should be played. These may no longer be required and so can be removed using the ‘Trim from Title’ button. This will also show, in the left most column, the final folder and file names which will be published to the SD card.
This will trim characters from every item below the currently selected collection. Care must be taken, if no collection is selected the action will be applied to ALL. In the case of errors, it is often quicker to abandon a project and start over (loading your saved copy of the project), rather than trying to correct each title individually.
Once you’ve imported all the files and verified the order in which they are displayed and trimed any unwanted charaters, click on the ‘Next’ button.
Edit Hierarchy
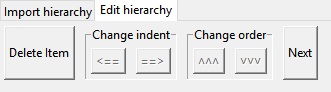
‘Simple’ mode will only allow you to delete unwanted files or collections. ‘Advanced’ mode allows you to restructure your hierarchy as well.
Select rows as necessary to either delete items or change their position in the hierarchy. When you import a folder, only the MP3 files will be listed but all sub-folders will be shown as collections whether they contain MP3 files or not.
Once any spurious collections have been removed and the hierarchy adjusted as you wish click on the ‘Next’ button.
Edit MP3 tags

Internally all text is held as unicode strings and will be written to the MP3 tags in the final files in ‘utf-8’ encoding. Tags which require ‘Latin1’ encoding will be automatically forced to a 7-ASCII sub-set of ‘utf-8’, or your preferred mapping. So while titles (TIT2) will be held and written as unicode characters, when Pub2SDwizard creates the filename which will be written to the SD cards all characters will be reduced to their base forms, diacritics removed, ligatures split and an approximate transliteration of any cyrillic, greek or non-roman characters will be attempted. In addition any punctuation or spaces will become underscore charaters, or your preferred characters.
( e.g. ‘à Â Þ Æ ç Ŋ ŋ ñ ƴ’ would become ‘a_A_Th_AE_c_NG_ng_n_y’)
In ‘Simple’ mode all tags will be represented as single strings of characters and their encoding and any other parameters will be hidden. Indeed only tags which can be treated in this way are available in ‘Simple’ mode.
In ‘Advanced’ mode the tags are shown as lists of parameters. The ‘encoding’ for text read from an MP3 tag will be shown as a single digit. Whatever the original encoding, the text will always be written in ‘utf-8’ represented by ‘3’. While text strings are typically held as a list of strings rather than a single string, what is displayed for any given tag depends on the users MP3 reader application. In general only the first string in the list is likely to be displayed.
First select the row you wish to edit. Only MP3 files can hold tags so any changes you apply to a collection will affect all MP3 files below it. Now select a tag from the drop-down list.
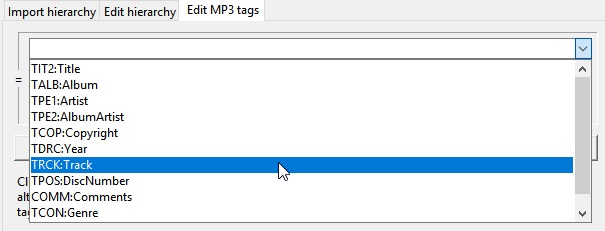
Either the current value of that tag or it’s default value should be shown automatically in the entry box. If it doesn’t appear then click on the ‘Get’ button. Or you can click on the ‘Get default’ button to get an empty template. Once you’ve modified it, click on the ‘Set’ button to apply the tag. If you’ve selected a collection this will overwrite that tag for all MP3 files below it.
In ‘Advanced’ mode some tags allow you to have multiple frames within a tag. (e.g. you may wish to add comments in French and English to the COMM tag, or front and back covers to the APIC tag.) Which fields within the tag frame (a set of parameters for that tag) are used to identify discrete frames is described in the label below the entry box. Use the ‘Get default’ button to get an empty template. When you click on the ‘Set’ button if the new frame is unique within the tag, it will be appended to the tag. Otherwise it will replace one of the existing frames. The multiple frames will be displayed as a list separated by ‘|’ characters. If you edit the list of frames directly clicking on the ‘Set’ button will overwrite all the existing frames in the tag.
When the users MP3 reader application displays the contents of the (TCOP) Copyright tag it will always be preceeded by the ‘©’ copyright symbol. This is fixed in the ID3 standards and can not be changed. Should you prefer to use the Sound recording copyright symbol ‘℗’ you will have to add that to the start of the copyright string. Though this will result in displaying both symbols preceeding the rest of the string (‘©℗’). Alternatively the (COMM) Comment tag could be used, but be aware the users MP3 reader application may not display the Comment tag.
Select Cover Artwork
In ‘Simple’ mode the (APIC) Cover tag can only be modified via the ‘Select Cover Artwork’ button.

The (APIC) Cover tag contains any images embedded inthe MP3 file. To save screen space any embedded image data is replaced with the place holder b’{}’, where {} is the size of the embedded graphic in Kilobytes. Since the image data will exceed 128bytes even for small png files it is easier to add artwork using the ‘Select Cover Artwork’ button. You may specify the nature of the artwork in the drop-down list below it.
In ‘Simple’ mode only only the ‘COVER_FRONT’ picture type is allowed and any description will be ignored.
Once you’ve added a image file it’s source location will be shown as a string rather than a place holder.
In ‘Advanced’ mode multiple images can be attached each with their own parameters shown as a ‘|’ separated list. You may add a brief description below. This description is used to distiguish multiple sets of parameters added to the APIC tag. But only one file icon can be added to an APIC tag, with either the ‘FILE ICON’ or the ‘OTHER FILE ICON’ picture type .
Special behaviors
In general attempting to set a tag on a collection will simply apply that tag to all MP3 files below it. However some tags have ‘special’ behaviors when a collection is selected:
TRCK: This may be simply a track number ‘4’ or a track within a set ‘4/20’. Specifying a track number of zero will result in all tracks below the collection to be numbered sequencially from ‘1’. Specifying an actual track number will result in them all having the same track number. Similarly if the ‘0/0’ track of set format is used, all files below that collection will be counted and listed as ‘track/total number of files’ . Again if a value other than zero for the ‘of set’ portion is entered (e.g ‘0/100’) the same ‘of set’ value will be applied to all files below that collection.
TSOA, TSOC, TSOP, TSO2: These tags are sometimes used to specify sort orders and may overide the order files are played in. Setting these tags on a collection will result in all files below it having their tags set to the unique name Pub2SDwizard generated for them.
Once you are satified with the contents of the tags click on the ‘Next’ button. This will take you to the ‘Feature_phone_options’ tab.
Feature-phone options
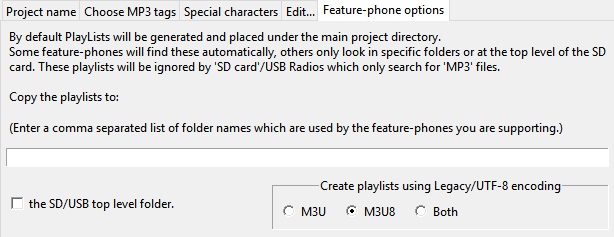
The ‘playlists’ generated by Pub2SDwizard can be copied either to the top level of the SD card or under folder names that you specify.
Note that the ‘playlists’ can be created in either ‘Legacy’ format (‘.M3U’ files using pre-Unicode fonts) or ‘UTF-8’ format (‘.M3U8’ files using Unicode fonts). While ‘.M3U8’ would be the standard for modern phones many older apps and phones may only support ‘.M3U’. If you need to support both then choose ‘Both’ which will generate the PlayLists in both formats, with only a small overhead file space used.
Now we can click on the button ‘Prepare Files’. This creates a temporary folder and makes working copies of all your MP3 files and applies the changes to their tags. This can take some time but you should see a progress bar and status line at the bottom of the window showing how far it’s got.
Output to…
Finally the ‘Output to…’ tab will appear.

You can either ‘Publish to SD/USB’ to publish to an SDcard/USB flash drive or ‘Publish to ~\Pub2SD\<project>_SD’ to publish to the default folder on your hard drive. This folder will be created for you if it doesn’t already exist, however if it does, any previous data in that folder will be erased.
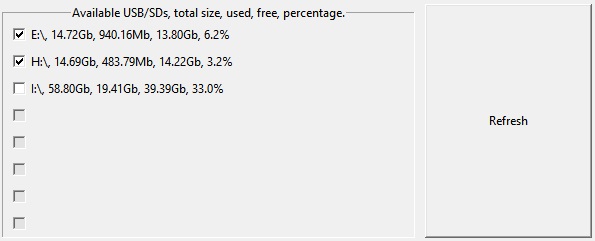
N.B. Only the first 8 removable drives found will be listed here. Make sure that any SD cards or USB drives you wish to output to are inserted, have sufficent free space and no folder names conflicting with your project name. For best performance ensure that they are connected to a USB3 port, via a USB3 hub if required. If you have multiple USB-SD card readers connected, use a mixture of different brands to avoid confusing the software. Be aware that Windows10 may not recognise the driver for a laptop’s built-in SD card reader.
Click on the ‘Refresh’ button to make sure the list of removeable drives is upto date. Then click on the checkbox of each of the SD/USB drives you wish to publish to.
After verifying that only the drives you wish to publish to are selected, click on the “Output to” button.

This will build and display the list of drives for publishing and confirm that they are all still connected and have suffcient free space.

Finally click on the button above. The progress bar will keep stepping across while the software is writing to the drives. The number of drives currently being written to is shown below that, with a completed message once writing to all drives has finished.

If you prefer you can publish to your hard drive by clicking on the above “Publish to HD” button and then later copy from the ‘~Pub2SD<project>_SD’ folder to another location as required.
When you click on one of the ‘Publish…’ buttons, all the new files will be created along with all necessary folders, then all the data copied to them from the working files and finally the new files will all be closed. This ensures that they all have the same ‘creation’ and ‘last modified’ dates.
While it is possible to move backwards and forwards through the tabs changing your project, the results are more predictable if you only do each stage in sequence. You can save the project settings at any time and will be offered the opportunity to change the name of the project. When you restart Pub2SDwizard and select an existing project all your previous work should be loaded for you and you can carry on from there.
We welcome any feedback and will endeavour to fix bugs as they are found. However ‘Errors and Omissions are Expected’, let the user beware! Again, be aware that individual applications and hardware may have implemented the ID3 standard differently and differ in their customary usage. Always test on the relevant application and hardware, no guarentees are given or implied!